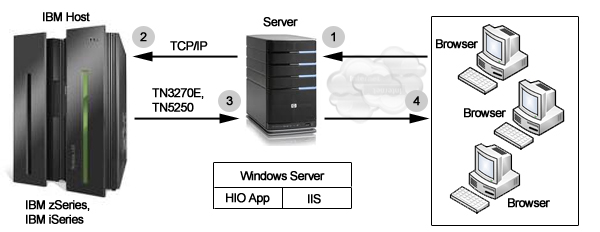
AutoHTML server application demonstrates how to quickly convert IBM S/390 and AS/400 applications into web applications through PASSPORT Host Integration Objects. PASSPORT Host Integration Objects plays the role of a server component, which provides access to host applications using 3270/5250 to HTML conversion. ASP.NET web page is easily embedded into the converted HTML with customization of each host screen. After the AutoHTML web server application is published, a user can interact with the 3270/5250 application through a web browser, such as Internet Explorer, Firefox or Google Chrome. Also, the administrator can manage/monitor the host sessions.
Step 1: Browser accesses HIO AutoHTML host application
Step 2: HIO AutoHTML Server starts host session
Step 3: Host sends screen to AutoHTML Server
Step 4: AutoHTML Server transmits HTML page to browser
Communication settings are stored in the Zephyr Communication Configuration (.ZCC) file. For more information, refer to the Configuration File page.
You must change the web.config file if you wish to use a different .zcc file:
<appSettings>
<!--
Define the location of a configuration file.
-->
<add key="MyProfile" value=".\zcc\Default_3270.zcc"/>
:
:
</appSettings>
A hotspot is an area of the HTML screen on which you can click the left mouse button to execute a command or function. In AutoHTML, hotspots can be presented in two different ways: buttons or links. There are three default hotspot files provided with AutoHTML installation:
DefaultBtns.zhs - shows hotspots as HTML buttons
DefaultLinks.zhs - shows hotspots as HTML links
Demo_Custom.zhs – shows hotspots as buttons or links (mixed).
You need to modify the .zcc file and add the hotspot parameter to enable hotspots:
Hotspot = Demo_Custom
Please note that the file extension should not be included in the above parameter.
You can also create your own custom hotspot file. The .zhs file must adhere to the following specifications. It is an ASCII file and each line in this file corresponds to a hotspot definition. The format of each line is as follows:
type,*,*,parm1,parm2,parm3
type parameter indicates the hot spot type:
0 = convert to button
1 = convert to link
2 = insert custom HTML
* This
is reserved for future use.
parm1 parameter
indicates the text in the screen buffer that AutoHTML will look to
convert into either a button, link or customize with custom HTML.
An example would be "PF1". This parameter must be enclosed
in double quotes.
parm2 parameter
(if the type is 0 or 1) indicates the text that is displayed in the
HTML page as either the text face of an HTML button, or the text displayed
as an HTML link. This text can be the same as specified in parm1
or can be something different. For example, parm2
could be "PF1" or could be "Help". If the type
is 0 or 1, this parameter must be enclosed in double quotes.
If the type is 2, the parameter is free form text that is the custom
HTML to replace the text in parm1
with. This text is not enclosed in quotes, may contain spaces and
is terminated by the cr if at the end of the line.
parm3 parameter (if the type is 0 or 1) indicates the host function key to send to the host when the hotspot button or hotspot link is clicked. If the type is 2, this parameter is not used.
Some examples of how you may customize your hotspot file are below:
0,*,*,"PF1","PF1",zep_PF1 (Type 0)
1,*,*,"PF1","Help",zep_PF1 (Type 1)
2,*,*,"PA2",<a onmouseover="return true" href="javascript:clickLink('zep_PA2')">PA2</a> (Type 2)
Below are the host AID keys being used by AutoHTML:
3270/5250 Keys |
Description |
zep_ATTN |
Sends a signal command to the host computer. The Attention key is used as a break key to interrupt the host execution of the current program. |
zep_CLEAR |
Erases the display and signals the host system that a clear action occurred. |
zep_CRSRSEL |
This key is used to indicate that a cursor select action has taken place in the chosen field. The '?' character changes to the '>' character. This key is used in light pen emulation. |
zep_ENTER |
Enter key for the host computer. Transmits information to the host. |
zep_PA1- zep_PA3 |
Program Attention keys. |
zep_PF1- zep_PF24 |
Program Function keys. |
zep_ROLLDOWN ** |
Asks the host system to roll the information on the display by issuing an aid code hex F4. This performs a page down action. |
zep_ROLLUP ** |
Asks the host system to roll the information on the display by issuing an aid code hex F5. This performs a page up action. |
zep_REFRESH |
|
zep_SYSREQ |
This key switches your program from a LU-LU session to a SSCP-LU session. |
zep_TESTREQ ** |
Used to perform additional tests of the system. |
AutoHTML session uses a JavaScript file (default.js) to control all keyboard mappings. Below are the JavaScript functions included in the default.js file:
submitHandler
fnTrapKeyDown
fnMoveFocus
fnSetCursorPos
fnUppercase
clickLink
fnCursorSel
fnCompStringWithCRLF
closeIt
This file is located in the AutoHTML Server folder. You may use a text editor to view for additional information on these functions.
It is referenced within <head> tag in the Default.aspx:
<head id="Head1" runat="server">
<title>Zephyr AutoHTML Session</title>
<link rel="Stylesheet" href="App_Themes/Theme_default/Default.css" type="text/css" media="screen" />
<script type="text/javascript" src="Default.js" language="javascript"></script>
:
:
<head>
Host Function |
PC Key Combination |
ATTENTION |
Esc |
CLEAR |
Pause/Break |
ENTER |
Enter/Keypad Enter |
PA1 |
Shift + Insert |
PA2 |
Shift + Home |
PA3 |
Shift + Page Up |
PF1 |
F1 |
PF2 |
F2 |
PF3 |
F3 |
PF4 |
F4 |
PF5 |
F5 |
PF6 |
F6 |
PF7 |
F7 |
PF8 |
F8 |
PF9 |
F9 |
PF10 |
F10 |
PF11 |
F11 |
PF12 |
F12 |
PF13 |
Shift +F1 |
PF14 |
Shift +F2 |
PF15 |
Shift +F3 |
PF16 |
Shift +F4 |
PF17 |
Shift +F5 |
PF18 |
Shift +F6 |
PF19 |
Shift +F7 |
PF20 |
Shift +F8 |
PF21 |
Shift +F9 |
PF22 |
Shift +F10 |
PF23 |
Shift +F11 |
PF24 |
Shift +F12 |
ROLL DOWN ** |
Page Down |
ROLL UP ** |
Page Up |
SYSTEM REQUEST |
Shift + Esc |
TEST REQUEST ** |
Alt + Pause |
AutoHTML uses CSS style sheets to control the appearance of its HTML pages. The foreground color, background color, and font attributes for 4 types of fields, protected normal, protected high intensity, unprotected normal and unprotected high intensity can all be changed to alter your application look and feel. You can select the default style sheet (.css) that comes with installing the AutoHTML application such as Default.css, etc. or you can create your own using the format below.
Here is a sample .css file that may be edited with Notepad or any text editor:
#u0 = unprotected normal
#u1 = unprotected high intensity
#p0 = protected normal
#p1 = protected high intensity
You may change the color, font style, and font size of these fields and apply the changes to your AutoHTML or custom host application. The .css files are located in <serverlocation>\App_Themes\Theme_Default\ for your AutoHTML sessions.
It is referenced within the <head> tag in the Default.aspx:
<head id="Head1" runat="server">
<title>Zephyr AutoHTML Session</title>
<link rel="Stylesheet" href="App_Themes/Theme_default/Default.css" type="text/css" media="screen" />
:
:
<head>
Note: the Admin.css style sheet file is used by the Admin page only.
There are several parameters defined in this configuration file, which is located in the C:\Program Files\PASSPORT Host Integration Objects\DotNetServers\AutoHTML folder by default:
<appSettings>
<!--
Define the location of a configuration file.
-->
<add key="MyProfile" value=".\zcc\Default_3270.zcc"/>
<!--
Wait_timeout: Maxmium time to wait after an AID key
Wait_quiet: The time out for check X condition
-->
<add key="Wait_timeout" value="10000"/>
<add key="Wait_quiet" value="500"/>
<!--
For the first screen, these three parameters were used to wait for data stream completion
CheckScreenText: if it needs to check the screen text false/true
TextPosition: the start position of the text;
TextToWait: the string to wait for
-->
<add key="CheckScreenText" value="false"/>
<add key="TextPosition" value="0"/>
<add key="TextToWait" value=""/>
</appSettings>
The sample application requires the following in order to run:
Windows Server 2003 or later with .NET Framework and ASP.NET installed
Internet Information Services (IIS) installed, configured and running properly
IIS and ASP.NET are not enabled by default when you install Windows Server 2008. Follow the steps below to enable these:
Click Start->Administrative Tools and open Server Manager.
In the right pane of Server Manager, expand the Roles Summary section and then click Add Roles.
In the Add Roles Wizard, select the Web Server (IIS) check box and then click Next.
In the Role Services step of the Wizard, select the Application Development role service, and then select the ASP.NET check box.
Complete the wizard to install the software.
Open IIS Manager from the Server Manager or click Start > Administrative Tools > Internet Information Services (IIS) Manager.
On the Connections pane, expand the server node, right-click Default Web Site and then click Add Application.
In the Add Application dialog, set Alias to “AutoHTML”. Navigate to the physical path of the AutoHTML directory (PASSPORT Host Integration Objects\DotNetServers\AutoHTML\ by default). Select an application pool for the application and then click OK.
If you are using the 64-bit version of Windows Server, you will need to enable a 32-bit Application Pool in IIS. On the Connections pane, click "Application Pools". Right-click your application pool and select "Advanced Settings...". Change "Enable 32-bit Application" to True.
Open a browser window/tab and navigate to http://<servername>/autohtml/default.aspx to see the AutoHTML host screen. Note that the .zcc configuration file may be edited to connect to a different host. By default this file is located in the C:\Program Files\PASSPORT Host Integration Objects\DotNetServers\AutoHTML\zcc\ folder and is called Default_3270.zcc. Also, this file is specified in the web.config file.
Open a browser window/tab and navigate to http://<servername>/autohtml/admin.aspx
to monitor/manage the host sessions created by clients.
Note: for additional information regarding HIO sample applications, please refer to the following page on the Zephyr website:
http://www.zephyrcorp.com/legacy-integration/host-integration-objects-more.htm